Above ground pool wall assembly is the physical part of the job, and it is where I see more setups go sideways than any other single step. A frame that goes together slightly out of round, or a steel wall joint that never gets tightened evenly, carries that mistake straight into the liner and the fill. This walks through the assembly sequence for soft-sided frame pools and steel wall pools, the specific points where I have watched setups go wrong, and the bonding step that gets skipped more than any other part of the job. It covers wall and frame only. Once the structure is solid and square, the next job is the liner, which I cover on its own.
The Hardest Physical Step in the Whole Install
Above ground pool wall assembly is the most physically demanding part of putting in a backyard pool, and it is also the part where having a second person on site makes the difference between a two-hour job and an all-day fight with a stubborn ring of metal that will not sit still. I have set up frames alone before out of necessity, and I do not recommend it. A 15-foot ring wants to move while you are trying to hold it steady, and a steel wall wants to bow the second you let go of it.
The good news is that the mistakes at this stage follow a predictable pattern. Almost every callback I get after a wall goes in wrong traces back to one of a handful of steps: the ring was never checked for round, the wall joint bolts went in loose, or the frame went up on a windy afternoon when the sheet metal had a mind of its own. Fix those and the rest of the assembly is mostly patience and a rubber mallet.

This 16-ounce rubber mallet uses a durable rubber head for soft-blow work where surface damage is a concern. Its fiberglass handle is designed to absorb shock, while the nonslip rubber grip improves control. The tool measures 13 inches long and is suitable for construction, flooring, woodworking, carpentry, and other soft-blow tasks.
Check On AmazonIf you click this link and buy, we earn a commission at no additional cost to you.
Before You Touch a Single Part
Read your specific model’s manual before you open the box further than you need to lay parts out. Assembly sequences vary by manufacturer and even by model year within the same brand, so the manual for your pool is the authority here, not a general sequence, and not what worked for your neighbor’s pool. If you are working from a full above ground pool setup guide for the rest of the project, this stage is the one where the manual takes priority over any general advice, including mine.
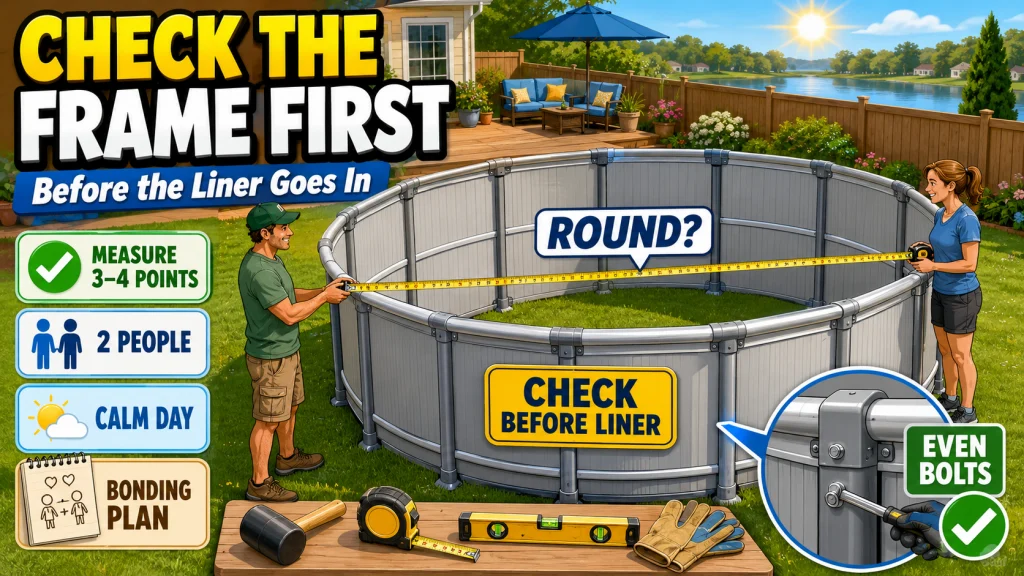
Lay out every part before you start connecting anything. It sounds obvious, but I have shown up to help a homeowner who was missing three uprights because they were still folded into the packing material. Have your tools staged and ready:
- Rubber mallet, for seating connectors and bottom rails without denting the metal
- Tape measure, for checking diameter and spacing at multiple points
- A level, for the base and for the wall itself as it goes up
- Work gloves, since steel edges and connector clips will cut an ungloved hand fast
- At least one helper for anything larger than a small inflatable frame pool
Do not start the wall and frame stage until every item on that list is on hand and you have a calm-weather window to work in. Missing a helper or trying to muscle a steel wall into place during a windy afternoon is where most of the structural mistakes in this article actually begin, before a single bolt is even turned. Once the tools and parts are staged, the actual sequence depends heavily on whether you are building a soft-sided frame pool or a steel wall pool, and the failure points are different enough that it is worth walking through them separately.
Soft-Sided Frame Pool Assembly
Soft-sided metal frame pools go together differently from a steel wall pool, and the sequence is usually more forgiving for a first-timer. Lay out all the frame tubes and connectors first so you can see what you are working with, then connect the horizontal base rails into the ring shape the pool is designed around. From there, insert the vertical uprights at each joint, working your way around the circle rather than finishing one side before starting the next.
The step people skip is verifying the ring is actually circular. Measure across the diameter at three or four different points before you add anything else. A ring that is slightly egg-shaped will still look fine standing there empty, but it puts uneven stress on the frame joints once water weight is added, and it makes the liner installation harder than it needs to be. This is a case where a first-time buyer commonly assumes the frame is self-correcting because the parts only fit one way. They mostly do, but a joint that seats at a slight angle will not announce itself until the pool is half full.
One thing that surprises new owners: frame pools have no rigid steel wall to roll into place. The liner goes in before filling and holds its shape almost entirely from water weight, not from the frame itself. That is a meaningfully different structure from a steel wall pool, so do not assume the two assembly sequences are interchangeable just because both end up looking like a round pool in the yard.
Steel Wall Pool Assembly
A steel wall pool, whether it is a permanent or semi-permanent installation, uses a rolled sheet of corrugated steel for the wall instead of a soft liner-and-frame combination. That sheet unrolls into the prepared track at the base, and the two ends join with bolt-on connectors. This is the step where a second person stops being a convenience and becomes a requirement. The wall has to stay vertical while it is being seated, and if you are alone on a breezy day, a wall this size will fold or lean before you can get a single bolt started.
INYO Pools’ own assembly instructions for erecting a steel wall make the same point I make on every install: do not raise the wall on a windy day, because a crease that forms when the sheet folds over will not come back out, and it becomes a permanent weak spot in the assembled steel wall. Have your helper hold the wall steady while you work the joint connectors, and tighten the bolts gradually and evenly rather than cranking one side all the way down before starting the other.
Field Note: The most common call I get a few days after a steel wall install is about a wrinkled liner, not a leaking wall. Almost every time, the root cause traces back to the wall joint not seating evenly during assembly. It is easier to fix at the bolt stage than to fix after the liner and the water are already in.
The wall joint is the structural connection point where the two ends of the steel sheet come together, and it carries real stress once the pool is full. Installers who specialize in these builds describe the wall itself as the part of the pool that has to hold its shape and resist outward water pressure while everything else, including the top rails and uprights, mostly keeps the wall positioned and capped. Torque the joint bolts to whatever your manual specifies, and do not assume “tight” is the same as “tight enough.” A joint that is snug by eye can still be under-tightened enough to shift once the pool starts filling.
Broken down into order, the sequence looks like this:
- Set the bottom edge of the wall into the prepared base track, working it in gradually rather than dropping the full sheet in at once
- Have your helper brace the wall vertical while you bring the two ends together at the joint location
- Align the joiner bar or bolt holes at both ends before threading a single bolt, so the wall is not fighting a misalignment while you work
- Start every bolt loosely by hand around the joint before tightening any of them fully
- Tighten the bolts gradually, working back and forth across the joint rather than finishing one end first
- Step back and check the wall for lean, gaps at the base track, or any crease before moving on to uprights
Only move on to uprights and top rails once the wall holds itself upright without your helper bracing it. That is the real signal the joint is doing its job.

This 3/8-inch drive torque wrench uses a hardened chrome vanadium steel ratchet head and a knurled nonslip handle. Its dual-range scale is pre-calibrated to ±4% accuracy. A click signals when the preset torque has been reached so the user knows when to stop applying force. A plastic storage case is included.
Check On AmazonIf you click this link and buy, we earn a commission at no additional cost to you.
Top Rail and Upright Installation
Once the wall is seated in the track and the joint is bolted, the uprights clip or bolt onto the wall at intervals specified in your manual, usually every few feet depending on pool diameter. The top rails then connect the uprights to each other at the top of the pool, which locks the whole ring into its final shape and gives the structure the rigidity it needs before water goes in.
At this point the structure is complete enough for liner installation, but resist the urge to rush ahead. Walk the full circumference and check that every upright is seated the same way and that the top rail sits level all the way around. An upright that is a half-inch off at the base will telegraph into a visibly uneven top rail, and that unevenness is far easier to correct now than after the liner and water are in place.
How the Build Differs by Frame Type
Homeowners comparing a soft-sided frame pool to a steel wall pool before buying often assume the assembly effort is roughly the same either way. It is not, and knowing the difference ahead of time changes how much help you should plan to have on hand.
| Build Step | Soft-Sided Frame Pool | Steel Wall Pool |
|---|---|---|
| Wall material | No rigid wall; liner holds shape from water weight | Rolled corrugated steel sheet joined with bolts |
| Minimum crew | One person is workable for smaller sizes | Two people, one to hold the wall vertical |
| Critical check before liner | Ring diameter measured at multiple points | Wall joint bolted evenly and torqued to spec |
| Weather sensitivity | Low | High; avoid raising the wall in wind |
The takeaway is not that one type is harder to own long-term. It is that the wall assembly step itself demands more from a steel wall build, so plan your helper and your weather window around that stage specifically rather than assuming the whole install carries the same difficulty from start to finish.
What to Do If the Frame or Wall Does Not Line Up
Even when you follow the sequence in order, parts do not always seat perfectly on the first try, and how you respond in that moment matters more than getting every step right the first time. If a soft-sided frame ring comes out egg-shaped after your diameter check, do not add the liner and hope water weight rounds it out. Loosen the joints near the widest and narrowest points, gently work the ring closer to true round, and remeasure before you move forward. Forcing the liner over a ring that is not round yet just relocates the problem to the liner seam.
If a steel wall will not sit flush in the base track, stop before you start bolting the joint. A wall that is fighting the track is usually a sign it went in at a slight angle or that debris is caught under the base rail, not something that gets fixed by muscling the top rail into place afterward. Pull the wall back, check the track, and reseat it rather than forcing the joint to close over a wall that is not sitting right. The same goes for bolt holes that do not align at the joint: that is almost always a symptom of the wall leaning or sitting slightly out of the track, not a defect in the parts, so trace it back to the seating step instead of drilling new holes or forcing bolts through misaligned metal.
Top rails that will not click or bolt into place cleanly are telling you something about the uprights below them, not about the top rail itself. Check upright spacing against your manual before applying more force, since a rail that needs to be hammered into place is usually compensating for an upright that sits a little off. And if you notice a crease anywhere in the steel wall, whether from a windy install or an awkward lift, do not continue on to the liner and fill as if nothing happened. A creased wall has a compromised point that outward water pressure will find eventually, and it is worth addressing before the pool ever holds water.
The Bonding Step Nobody Wants to Pay For
Here is the part of wall and frame assembly that has nothing to do with mallets or bolts and everything to do with electrical safety. Above ground pools that run an electric pump require equipotential bonding: a copper wire connected to the pump, the pool water, the pool wall, and any metal within 5 feet of the pool. This is an electrical safety requirement under the National Electrical Code in most US jurisdictions, and it exists to keep every metal surface near the pool at the same electrical potential so a stray current cannot create a shock hazard between the water and the deck.
Warning: Equipotential bonding must be installed by a licensed electrician. This is not a step to skip or improvise, and it is separate from the pump’s power circuit. Most above ground pool pumps also need a dedicated circuit, and installation guides consistently point to a 20-amp breaker with 12-gauge wire as the typical setup, though your electrician should confirm what your specific pump draws.
I bring this up during wall and frame assembly, not later, because the bonding wire is easiest to route while the frame is still open and accessible, before the liner and the deck material close everything in. Owners who wait until after the pool is full end up paying an electrician to work around water and a finished setup instead of an open frame. In many jurisdictions, pools deeper than 42 inches are treated differently from small storable pools once electrical code applies, so do not assume bonding is optional just because your pool is above ground rather than in-ground; have an electrician confirm what applies to your specific setup and local code.

This 25-foot conductor is made from solid, soft-drawn bare copper. It is 8 gauge and is intended for grounding, uninsulated hook-up, jumpers, and related electrical construction applications. The conductor uses single-strand solid copper construction without insulation.
Check On AmazonIf you click this link and buy, we earn a commission at no additional cost to you.
Final Thoughts: Get the Structure Right Before You Chase the Water
Wall and frame assembly rewards patience more than strength. Every structural mistake in this stage, an out-of-round ring, an uneven wall joint, a skipped bonding wire, is cheap to fix right now and expensive to fix once the pool is full of water. That is really the whole lesson here: five extra minutes with a tape measure or a torque check costs you nothing today and can save you a rebuild later.
From here, the structure is ready for the liner, which is a different set of mistakes entirely and worth reading on its own before you unroll it. If you are still working through earlier stages of the project, the full above ground pool setup process will show you where this step fits before and after.

This 25-foot retractable tape measure includes both imperial and metric markings for flexible measurement work. Its rubberized case is designed to absorb shocks during use. A hook slot can secure the blade to a nail or screw head, while the thumb lock holds the blade at the required length. A rear belt clip provides convenient tool storage.
Check On AmazonIf you click this link and buy, we earn a commission at no additional cost to you.
FAQs
🔧 Do I need two people to assemble an above ground pool wall?
For a steel wall pool, yes. The wall has to stay vertical while the joint is being bolted, and one person cannot hold a full sheet steady and work the connectors at the same time. Soft-sided frame pools are more forgiving and can sometimes be managed solo on smaller sizes.
📏 How do I know if my pool frame is round before adding the liner?
Measure across the diameter at three or four different points around the ring before the liner goes in. If the measurements vary by more than an inch or two, the ring is not round yet and needs adjustment before you continue.
⚡ Do all above ground pools need bonding wire?
Pools with an electric pump generally do, and depth matters: pools deeper than 42 inches are often treated differently from small storable pools under electrical code. Rules vary by jurisdiction, so have a licensed electrician confirm the requirement for your specific pool.
🌬️ Can I assemble a steel wall pool on a windy day?
It is not a good idea. A gust can fold the wall sheet before you can get it braced, and a crease from that fold does not come back out. Pick a calm day or wait for one, especially for larger pools where the wall panel is heavier and harder to control.
🔩 What happens if the wall joint bolts aren’t tightened evenly?
An unevenly tightened joint creates a weak point that can shift once the pool starts filling, which often shows up later as a wrinkled liner near the seam. Tighten bolts gradually and evenly around the joint rather than fully tightening one side first.
🏊 What’s the difference between the frame and the wall on a steel wall pool?
The wall is the rolled steel sheet that holds back the water. The frame, meaning the uprights and top rails, keeps that wall positioned and capped but is not what resists the outward water pressure. The wall does most of the structural work.
Sources and References
- INYO Pools’ step-by-step guide on erecting the steel wall of an above ground pool confirms the wind-related crease risk and the bolt-and-joiner-bar wall joint method described above.
- MGK Pools’ expert comparison of steel wall versus aluminum wall above ground pools supports the description of how the wall carries structural load while the frame keeps it positioned.
- Family Handyman’s above ground pool installation guide cites INYO Pools on the typical 20-amp breaker and 12-gauge wire requirement for a pump circuit and recommends hiring a licensed electrician for that work.
- Trouble Free Pool’s wiki entry on electrical bonding for swimming pools confirms the National Electrical Code requirements for 8 AWG copper bonding conductors and the 5-foot bonding radius around fixed metal parts described above.