Above ground pool assembly breaks down into three stages that behave nothing alike: getting the wall and frame standing, getting the liner into place without wrinkles, and getting the water in while the pump comes online. Most owners move through the frame quickly, then get stuck once the liner comes out of the box. This guide walks through what happens at each stage, why the liner and the first fill tend to cause the most trouble, and which detailed guide to use for each stage.
Where Above Ground Pool Assembly Actually Goes Wrong
I have watched a lot of first-time owners handle above ground pool assembly, and the pattern repeats almost every time. The wall and frame go up without much drama. Most kits use a handful of connector types and a logical sequence, so once you understand the pattern for your specific frame, the rest is repetition. The trouble shows up two steps later, once the liner is unrolled and the hose is running.
The liner is where patience and technique actually matter. Get it wrong and you are looking at wrinkles that never fully smooth out, or worse, a liner that stretches unevenly and wears through early. The first fill and pump connection is the other pressure point, mostly because it happens at the same time you are also trying to keep the liner smooth. Doing both at once is where a lot of owners lose track of one job while focused on the other. The sections below cover what each stage actually involves, with links to a full walkthrough for the two that deserve more depth.
Wall and Frame Assembly: Getting the Structure Up
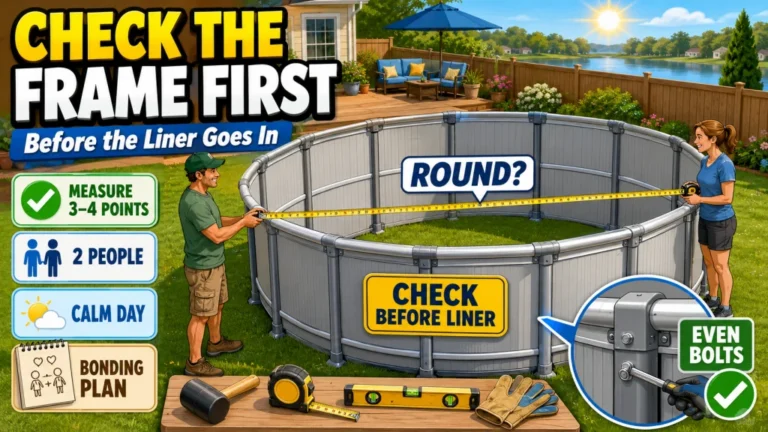
Putting together an above ground pool frame is mostly a matter of following the sequence and not skipping connectors. Bottom rails or plates go down first, tracking the shape you already leveled and laid out. Uprights or posts follow, then the wall panel goes into the track, and top rails or caps close the loop and lock everything in place. The steps sound simple written out, but the order matters more than people expect. Skip a bottom connector because it seems redundant and you end up with a wall that flexes unevenly once water pressure builds.
Two details cause most of the frustration here. The first is forcing a wall panel into the track before the base is fully square, which makes every connector after that fight against a slight misalignment. The second is under-tightening or skipping fasteners because the frame already looks stable standing empty. An empty frame is not under load. Once thousands of gallons of water push outward against that wall, every loose connection becomes a weak point. If you want the full connector-by-connector sequence and the specific mistakes that show up on steel frame versus soft-sided kits, the step-by-step wall and frame assembly guide covers it in more detail than makes sense to repeat here.
Liner Installation: Why Wrinkles Set the Tone for Everything After
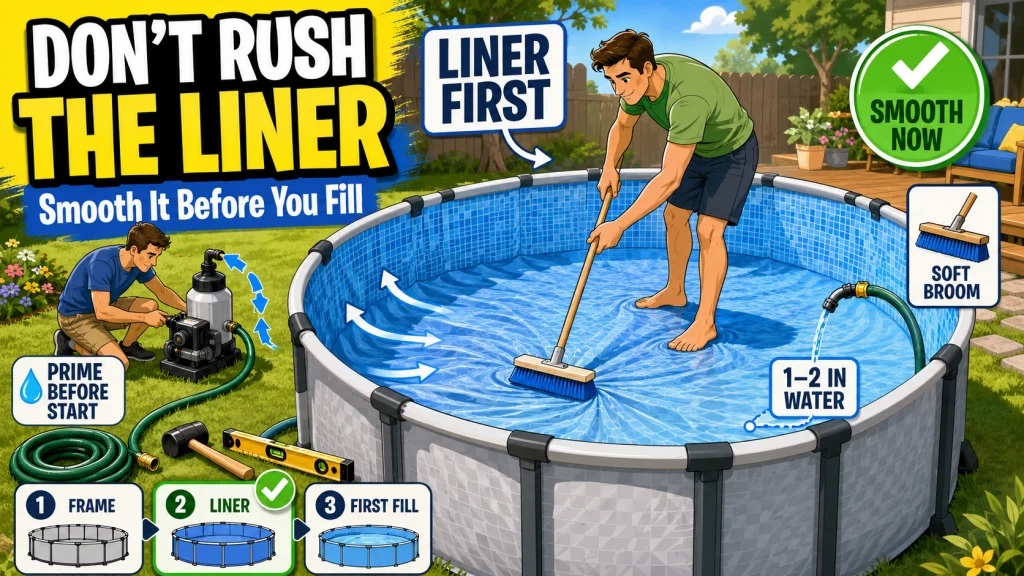
The liner is the step where most owners either build confidence or get discouraged. Wrinkles are the enemy, and the fix has to happen before serious water goes in. This is the last easy moment to fix the floor. Once a wrinkle is covered with a few feet of water, it is essentially locked in place. Liner suppliers and installers consistently point to the same fix: work wrinkles out toward the wall while there is still only an inch or two of water on the floor, either by hand, by walking them out barefoot, or by pushing them with a soft push broom.
Timing the water is just as important as the technique. One widely used method involves adding a few inches of water while slowly moving from the center of the pool toward the walls, lightly pressing the liner flat as you go. That keeps the liner from locking in a wrinkle while there is still enough slack to work with it. A soft-bristle push broom is the standard tool for smoothing the pool floor once the bulk of the wrinkles are worked toward the edges, since dragging or forcing the liner by hand risks tearing it.
Pro tip: lay the liner out in the sun for a while before you start if the day allows it. A warm liner is more pliable and stretches into place with far less fighting than a cold, stiff one straight out of the box.
Overlap and beaded liners behave a little differently once they are draped over the wall, and getting the overlap even or the bead seated correctly around the entire perimeter is its own small skill. This is exactly the kind of detail that turns a smooth installation into a frustrating one if it is rushed. The no-wrinkle liner installation technique walks through the full sequence for both liner types, along with what to do if wrinkles are already forming by the time you notice them.

This 18-inch brush features a curved body designed to reach pool corners, stairs, walls, floors, and tile, with a rubber bumper that protects vinyl liner pools from scratches while removing dirt and grime. The wide brush head covers large surface areas, and the high-density bristles withstand high temperatures for regular use. A clip adapter allows quick assembly with a standard pool pole, sold separately.
Check On AmazonIf you click this link and buy, we earn a commission at no additional cost to you.
First Fill and Pump Connection: The Two-Person Job
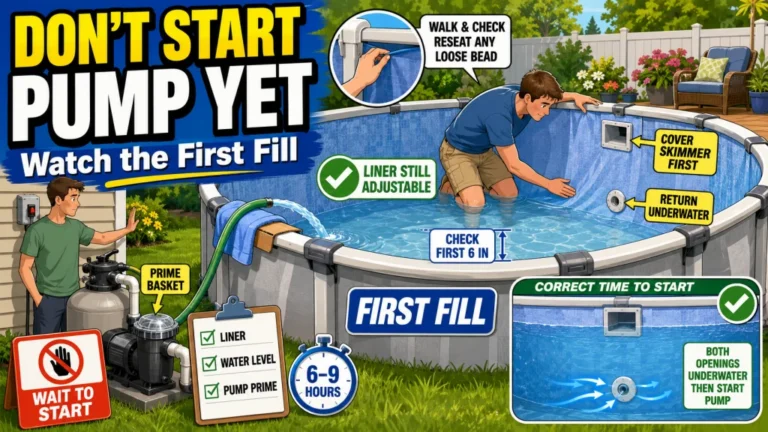
Filling the pool and getting the pump running are two separate tasks that end up happening close together, and that overlap is where owners lose track of something. While the water climbs, you are still watching the liner for wrinkles and stretching, which means the pump connection often gets rushed or handled by whoever else is around. Above ground pool pumps typically sit below the water level, and they need water inside the pump housing before they will run correctly. Running the pump dry, even briefly, risks damaging the seal.
Before the pump ever gets powered on, hoses need to be seated correctly at both the pool wall fittings and the pump or filter connections, with clamps tightened enough to hold under pressure but not so tight that they crack a fitting. Once the pool has enough water to submerge the skimmer or return openings, priming the pump is the next step. The standard method is filling the pump strainer basket with a garden hose or a few gallons poured directly in, replacing the lid, and turning the pump on. Water should reach a steady flow within 30 to 60 seconds. If it does not, the usual culprits are a loose lid, a dry strainer basket, or an air leak somewhere on the suction side.
- Confirm every hose clamp is tight before the pump ever gets power.
- Do not run the pump until there is enough water in the pool to cover the skimmer or return fitting.
- Fill the strainer basket before the first startup instead of hoping the pump primes itself.
- Watch the lid seal and O-ring; a loose or dry seal is the most common reason a pump will not hold prime.
Getting this sequence right the first time saves a callback later, since a pump that never primed correctly at startup tends to keep struggling every time it shuts off. The first fill and pump connection walkthrough covers the full order of operations, including what to check before you turn the pump on for the very first time.

Made from high-quality stainless steel, these hose clamps resist corrosion, salt, and most chemicals, helping protect your pool filtration system from rust and breakage. The adjustable screw design allows for easy, hassle-free tightening during installation. They fit any pool filter connection hose from 1-1/4 inches to 2 inches in diameter, and also work well for air and fluid line applications in marine, HVAC, and industrial settings.
Check On AmazonIf you click this link and buy, we earn a commission at no additional cost to you.
Assembly Checkpoints Before You Move to the Next Stage
Each stage has a quick way to tell whether you are actually ready to move forward or whether you are about to carry a problem into the next step. Once the water is deep, the wrinkle is no longer a wrinkle. It is part of the floor. The same logic applies to the frame and the pump: some mistakes are easy to fix at one point and nearly impossible to fix ten minutes later.
| Checkpoint | Move on only if | Stop and fix if |
|---|---|---|
| Before the liner goes in | The wall and frame are seated, the base is square, and every connector and fastener is installed | A wall panel is fighting the track, the base looks out of round, or connectors are missing |
| Before serious filling | The liner is centered, floor wrinkles are worked toward the edges, and the overlap or bead is even all around | Wrinkles are still visible after an inch or two of water, or the liner is pulling harder on one side |
| Before pump startup | Water covers the skimmer or return fitting, hoses are seated, clamps are tight, and the strainer basket has water in it | The strainer basket is dry, the lid or O-ring is loose, or water is not moving after 30 to 60 seconds |
| Before you walk away | The wall is stable, the liner is not shifting, and the pump is holding prime | The water level changes on its own, there is a suction-side air leak, or a fitting is dripping |
| Stage | What matters most | Most common mistake |
|---|---|---|
| Wall and frame assembly | Following the connector sequence in order | Forcing a panel into the track before the base is square |
| Liner installation | Working wrinkles out before real water weight sets in | Letting water rise before the floor is smooth |
| First fill and pump connection | Priming the pump correctly on the first try | Powering on the pump before the strainer basket has water |
Treat these checkpoints as a pause button, not a formality. A few extra minutes at any one of them is almost always cheaper than draining water or pulling a liner back out later.

This torpedo level features 4 vials for vertical, horizontal, 45 degree, and multi-pitch readings, with the multi-pitch vial measuring slope in 1/8 inch per foot increments. A magnetic edge with over 2 pounds of holding force allows for hands-free use, while the reinforced aluminum frame offers shock-absorbing durability. It delivers accuracy up to 0.001 inch per foot and includes a V-groove bottom for curved surfaces, top view holes, and hanging holes for easy storage.
Check On AmazonIf you click this link and buy, we earn a commission at no additional cost to you.
Final Thoughts: Slow Down for the Middle Stage
Most assembly problems do not come from missing the instructions. They come from rushing the liner or the pump startup while the excitement of finally filling the pool takes over. Run through it in order: frame aligned and fastened, liner smooth with no wrinkles left behind, pump primed and holding water, then step back and watch it run for a few minutes before you call it done. Once the structure is up and holding water, the next real decision point is how you bring the water into balance, which is covered separately in the chemical startup process for a freshly filled pool.
Explore More Above Ground Pool Guides
Each stage above has a full walkthrough with the specific technique, tools, and mistakes to watch for. These are worth reading in order if you are working through assembly for the first time.
| Guide | What it helps with |
|---|---|
| Above Ground Pool Wall Assembly | The connector-by-connector sequence for getting the frame and wall structure standing correctly. |
| Above Ground Pool Liner Installation | The no-wrinkle technique for both overlap and beaded liners, plus fixes if wrinkles already formed. |
| Above Ground Pool First Fill | The order of operations for filling the pool and priming the pump on the first startup. |
Once all three stages are done, the pool is structurally ready and the water is circulating. From there, the next task is getting the chemistry started correctly before anyone swims.

This mallet features a double-faced solid rubber head for a softened, positive strike, paired with a high-strength fiberglass handle core that helps absorb vibrations. An exterior poly jacket protects the handle from missed strikes, while the soft, nonslip rubber grip is directly integrated into the handle so it can never pull loose. It is well suited for construction, woodworking, and automotive applications.
Check On AmazonIf you click this link and buy, we earn a commission at no additional cost to you.
FAQs
🏊 How long does above ground pool assembly usually take?
Most owners can get the frame and wall up in a few hours. The liner and first fill together usually take another half day once you account for smoothing wrinkles and filling slowly, so plan for a full day rather than an afternoon.
🧰 What tools do I need to assemble an above ground pool?
A rubber mallet, a level, a soft push broom for the liner, and a garden hose cover most of it. Some frame types also call for a socket wrench or screwdriver depending on the connector style.
💧 Can I fill the pool before the liner is completely wrinkle-free?
Only a small amount of water, an inch or two, while you are still actively working the wrinkles toward the wall. Letting the water rise past that point locks any remaining wrinkles in place.
🔌 Why won’t my pump prime on the first try?
The most common reasons are a strainer basket that was never filled with water before startup, a loose pump lid, or an air leak on the suction side. Check those three before assuming the pump itself is faulty.
🌬️ Do I need two people to put together an above ground pool?
The frame can often be done solo, but the liner and first fill go much smoother with a second person. One person can watch the liner for wrinkles while the other manages the hose and pump connection.
🧹 What should I use to smooth out liner wrinkles during setup?
Bare hands or feet work for small wrinkles, and a soft-bristle push broom works well for larger areas. Avoid dragging the liner forcefully, since that risks tearing the vinyl.
Sources and References
Every claim above that depends on outside evidence traces back to one of the following:
- LinerWorld’s guide to installing a liner without wrinkles, on removing wrinkles before adding water and using a soft push broom.
- Angi’s pool liner installation walkthrough, on adding a few inches of water while walking wrinkles out toward the wall.
- Pool Warehouse’s liner installation instructions, on smoothing the liner floor toward the wall and working out wrinkles as the pool fills.
- Swim University’s guide to priming a pool pump, on filling the strainer basket before startup and expected prime time.
- The Pool Factory’s above ground pool pump priming guide, on common causes of a pump losing prime.