Above ground pool track placement and bottom cove are the two steps that decide how long your liner actually lasts, and most assembly manuals barely mention either one. I have serviced pools where the owner did everything else right and still watched the liner crack at the wall base within two seasons, because the track sat on sand instead of compacted ground, or the cove got skipped entirely. This covers exactly where the track needs to sit, how to build a proper sand cove once the track is down, and why a 90-degree angle at the wall base is the single most predictable place a liner will fail. If you are assembling a hard-sided above ground pool with a bottom track this weekend, these two steps take an extra hour and change what your liner looks like in year five.
The Two Steps Every Assembly Manual Rushes Through
Above ground pool track and cove work get maybe two sentences in most box manuals, and that is exactly backward. In my experience, these two steps determine more about liner lifespan than the base material, the pump size, or the chemical routine that everyone worries about first. The track is the bottom rail that the whole wall sits in, and the cove is the shaped sand mound that goes in afterward where the wall meets the floor. Skip either one, or do them in the wrong order, and you are setting up a liner failure that may not show up until the pool is full. By then, taking it back apart is no longer a quick fix.
The most common call I get after a first-season assembly is a bulging liner or a stress crease right at the base of the wall, and it almost always traces back to one of these two steps. Once I ask a few questions, the pattern is usually obvious: the track went down on loose sand, or the cove was skipped because the manual made it look optional. Neither mistake is visible on installation day. Both show up months later, once the water is in and the pressure is doing its work.
Why the Track Cannot Sit on Sand
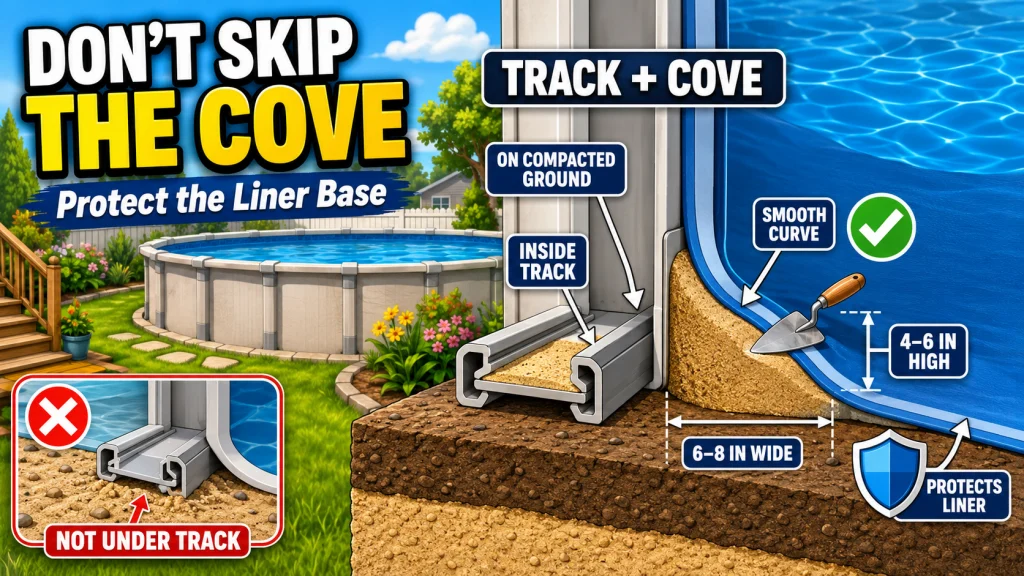
The bottom track is structural, not decorative. It carries the weight of the wall and the outward push of thousands of gallons of water, so it needs to sit on compacted virgin soil or a concrete footing, never on loose sand. Pool installers have documented this exact failure pattern for years: when the track is set on sand, the sand washes out over a season or two and the pool settles unevenly or the track shifts out of position entirely. I have pulled apart pools where one section of track had sunk almost an inch lower than the rest, and every time, sand was sitting directly under the rail with nothing compacted underneath it.
The confusion happens because sand does belong in this project, just not under the track. Sand is the liner protector that goes inside the track once the ring is set, and it gets shaped into the cove later in the process. Mixing up “sand under the track” with “sand inside the track” is the most common track-on-sand mistake I run into with above ground pools, and it is an easy one to make if you are following a manual that glosses over the distinction. The rule to remember: if you can see bare soil or a footing under the rail, you are doing it right; if you see sand under the rail, stop and fix it before you go any further.
Note: This track and cove process applies to hard-sided above ground pools built around a bottom track and a wall panel, the kind where the liner is a separate piece that gets installed after the wall and track are set. If your pool is a soft-sided frame pool or an inflatable model with no bottom rail, this step does not apply the same way, and you can skip straight to the base and liner guidance for that pool type instead.

This tamper features an 8-inch by 8-inch head and a durable steel handle measuring 48 inches for reliable performance. A slightly padded end-grip offers added comfort and control during use. Designed for tamping asphalt, gravel, and dirt, it is well suited for a range of outdoor and construction tasks.
Check On AmazonIf you click this link and buy, we earn a commission at no additional cost to you.
How to Position the Track Correctly
Start with the ground itself. Before the track goes down anywhere, the ring where the pool will sit needs to be leveled and, ideally, dug down slightly so the track rests on compacted virgin soil rather than fill dirt that was just spread on top. I go over this leveling and dig-down process in more detail in the guide on preparing the ground before assembly, since that step happens before the track ever gets laid out, and rushing it is where a lot of track problems start before the track is even in the box.
Once the ground is prepped, lay the track around the full perimeter on that compacted surface and check it for level at multiple points, not just one or two. Only after the track is down and confirmed level do you add sand, and that sand goes inside the track ring, never underneath it. If you have already put down a base layer as part of your ground prep, the choice between sand, crushed stone, or a foam base pad affects how the track sits too, which is covered separately in the piece on choosing a base material for the pool floor. Getting the sequence right, ground first, track second, interior sand third, is what keeps the whole structure sitting evenly for the life of the liner.

This torpedo level features 4 vials for vertical, horizontal, 45 degree, and multi-pitch readings, with the multi-pitch vial measuring slope in 1/8 inch per foot increments. A magnetic edge with over 2 pounds of holding force allows for hands-free use, while the reinforced aluminum frame offers shock-absorbing durability. It delivers accuracy up to 0.001 inch per foot and includes a V-groove bottom for curved surfaces, top view holes, and hanging holes for easy storage.
Check On AmazonIf you click this link and buy, we earn a commission at no additional cost to you.
What the Bottom Cove Actually Does
An above ground pool sand cove is a curved mound of compacted sand built against the inside base of the wall, right where the wall meets the pool floor. Its job is to eliminate the sharp 90-degree angle that would otherwise exist at that joint. Without it, the liner has to bend at a hard right angle under the full weight of the water pushing against the wall, and vinyl does not like sharp angles under constant pressure any more than a hose does at a tight kink.
That 90-degree angle is a pressure point, plain and simple. Water pushes the liner outward against the wall, and where the wall meets the floor without a cove, that pressure concentrates right at the corner instead of spreading across a curve. Over a season or two, that concentrated stress shows up as a crease or a stretch mark in the liner exactly where the wall meets the floor, and once a liner develops a stress crease there, it is a matter of when, not if, it becomes a leak or a tear.
How to Form the Cove After the Sand Base Goes In
Once the interior sand base is down inside the track, forming the cove is hands-on work, and it is worth doing slowly. Using a margin trowel or a dedicated cove tool, pull sand up against the base of the wall all the way around and shape it into a curved mound roughly 6 to 8 inches wide and 4 to 6 inches high. The goal is a smooth curve, not a sharp step, so the liner transitions gradually from floor to wall instead of folding at a corner.
- Confirm the track is level and sitting on compacted soil before adding any interior sand.
- Lay and compact the interior sand base evenly across the entire floor first.
- Shape the cove last, working the full perimeter so there are no flat spots or gaps.
- Check the cove height and width against the wall at several points, not just one section.
- Smooth the sand surface right before the liner goes in, since foot traffic will disturb it.
Some installers use foam cove strips instead of shaping sand by hand. These are pre-formed strips designed to sit against the wall base, and they tend to install more consistently than a hand-shaped sand cove, especially for a first-timer who has never done this before. Either method works as long as the final shape eliminates that hard angle at the wall base; the sand version just takes a steadier hand and a bit more patience to get an even curve all the way around.

This concrete nose tool features a blue steel blade measuring 6 by 6 by 6 inches with a 1/2-inch radius and a cove style blade set at a 90 degree angle, designed to finish concrete step edges and coves and help prevent future cracking. It comes fitted with a DuraSoft handle for a soft feel, reduced fatigue, and lasting durability. Made in the USA with global materials.
Check On AmazonIf you click this link and buy, we earn a commission at no additional cost to you.
What Happens When the Cove Gets Skipped
Field Note: The pool that stands out most in my memory is an 18-foot steel-wall above ground pool where the owner did the ground prep, leveled the track carefully, and then skipped the cove entirely because the manual photo made it look like an optional finishing touch. By the second summer, the liner had a visible crease running the full circumference of the wall base, and by year three it had started weeping at two spots along that same line. We ended up replacing the liner three to four years earlier than it should have needed replacement, and the cove was the only step that had been left out.
That pattern holds up across most of the service calls I get for early liner failure. Pools without a proper cove consistently show wear at the wall-floor junction first, well before the rest of the liner shows any age. It is one of the more frustrating calls to make because the fix at that point is a full liner replacement, not a patch, and the owner is usually surprised that a step they never saw mentioned anywhere is the reason.

Made from durable HDPE, this foam cove keeps its shape under water pressure, creating a protective buffer between the wall and liner that prevents stretching, ballooning, and punctures. Unlike sand coves, it offers a consistent, uniform profile that resists uneven settling. The peel-and-stick backing allows tool-free installation on any clean, dry surface. This 24-pack provides 98 feet of coverage, suited for round pools up to 30 feet or oval pools up to 18 by 33 feet, and fits any brand.
Check On AmazonIf you click this link and buy, we earn a commission at no additional cost to you.
Sand Cove vs Foam Cove Strips
Both methods solve the same problem, but they fit different situations depending on experience level and how much time you want to spend getting the shape right. The table below breaks down where each one makes sense.
| Method | Where It Fits Best |
|---|---|
| Hand-shaped sand cove | Lower material cost, works with the sand you already laid, but takes a steady hand to get an even curve roughly 6 to 8 inches wide around the full perimeter. |
| Foam cove strips | More consistent shape with less skill required, good for a first assembly, but adds a separate material to source before setup day. |
Neither option is the “correct” one across the board. If you already have sand on site and some patience, shaping it by hand costs nothing extra. If this is your first pool and you are worried about making an uneven sand cove, foam cove strips remove one of the easiest installation variables to get wrong. What matters is that one of the two actually goes in before the liner does, not which one you pick.
Final Thoughts: Two Steps, One Afternoon, Years of Difference
Track placement and the bottom cove are not the parts of assembly that photograph well for a manual, but they are the parts that decide whether your liner makes it to year eight or starts creasing in year two. Get the track on compacted ground instead of sand, then take the extra hour to shape a real cove, sand or foam, before the liner goes in. If you have not gone through the ground preparation stage yet, that is the right place to start before the track ever comes out of the box.
If you already have a pool assembled and are noticing a crease or bulge at the wall base, that is usually a cove problem showing up late rather than something wrong with the liner itself. It is worth checking before you assume the liner is defective.
FAQs
🏗️ Can the pool track sit directly on sand?
No. The track needs to sit on compacted virgin soil or a concrete footing. Sand under the track washes out over time and causes the pool to settle unevenly or the track to shift out of position.
🧱 What is a bottom cove on an above ground pool?
It is a curved mound of compacted sand, or a foam strip alternative, built against the inside base of the wall. It eliminates the sharp 90-degree angle between the wall and floor that would otherwise stress the liner.
📏 How wide and tall should a sand cove be?
Aim for roughly 6 to 8 inches wide and 4 to 6 inches high, shaped as a smooth curve around the full perimeter of the wall base rather than a sharp step.
⚠️ What happens if I skip the cove?
The liner develops a stress crease at the wall-floor junction. That crease becomes a high-stress point that is more prone to tearing and premature wear, often shortening liner life by several years.
🧰 Are foam cove strips better than sand?
Foam strips give a more consistent shape with less skill required, which helps on a first assembly. A hand-shaped sand cove works just as well if you take the time to keep the curve even.
🔍 How do I know if my track was set on sand by mistake?
Uneven settling, a section of track sitting lower than the rest, or visible sand directly beneath the rail instead of compacted soil are the clearest signs. Catching it before the liner goes in is much easier than fixing it afterward.
Sources and References
- Pool Pros, a Wisconsin above ground pool installer, documents track-on-sand as a top installation mistake, confirming that sand under the track washes out and causes the pool to settle or sink.
- INYOPools’ above ground pool installation guide confirms the standard cove wedge dimension as roughly 6 to 8 inches around the base of the pool wall.
- The Pool Factory’s sand base and cove installation guidance, sourced from manufacturer installation manuals including Wilbar International, Trendium Pool Products, and Trevi, confirms a foam cove height of approximately 7 inches when built on top of a standard sand base, serving the same wall-to-floor transition purpose as a hand-shaped sand cove.
- Field observation and service history from residential above ground pool liner replacements, used for the pattern of early liner failure at the wall-floor junction when the cove step is skipped.