If you are working out how to level ground for an above ground pool, the method most people default to, pushing the high dirt into the low spots, is the exact reason so many pools end up tilted within a season. The correct approach is the opposite: you dig down to the lowest point of the footprint and remove soil from everywhere else, so the entire pool sits on ground that was never disturbed. This guide walks through why pushed dirt settles under the weight of a full pool, how close to level your site actually needs to be, and what to do about roots, rocks, and the odd shallow dip in the yard. It covers leveling only, not the base layer that goes down afterward or the track placement that follows it.
Why Pushing Dirt Up Always Fails
If you are trying to figure out how to level ground for an above ground pool, ignore the shortcut that looks obvious the first time you stand in the yard with a shovel. Most first-time owners see a low corner, grab a wheelbarrow, and move dirt from the high side to fill it in. The yard looks flat by the end of the afternoon, the pool goes up a day or two later, and everything looks fine for the first month. I have gone back out to more of these installs than I can count, usually four to six months later, and found the exact same problem every time: the filled corner has sunk an inch or two while the rest of the pool held its position. This step is one part of a longer sequence, and if you have not already worked through the full ground preparation process for above ground pools, it is worth reading before you touch a shovel, since leveling only makes sense once you know what comes right after it.
Here is the part that does not show up on the box instructions. A 15-foot pool at 48 inches deep holds roughly 4,440 gallons of water. Water weighs 8.34 pounds per gallon, which puts about 37,000 pounds of static pressure on the base once that pool is filled. Think of virgin soil like a mattress that has already broken in over years of the same weight sitting on it every night. It has already settled into its natural density. Loose fill dirt is the mattress straight out of the box: it still has air pockets and organic material working through it, and 37,000 pounds sitting on top for months is what finally pushes that settling to happen, right under your liner.
The Dig-Down Approach That Actually Works
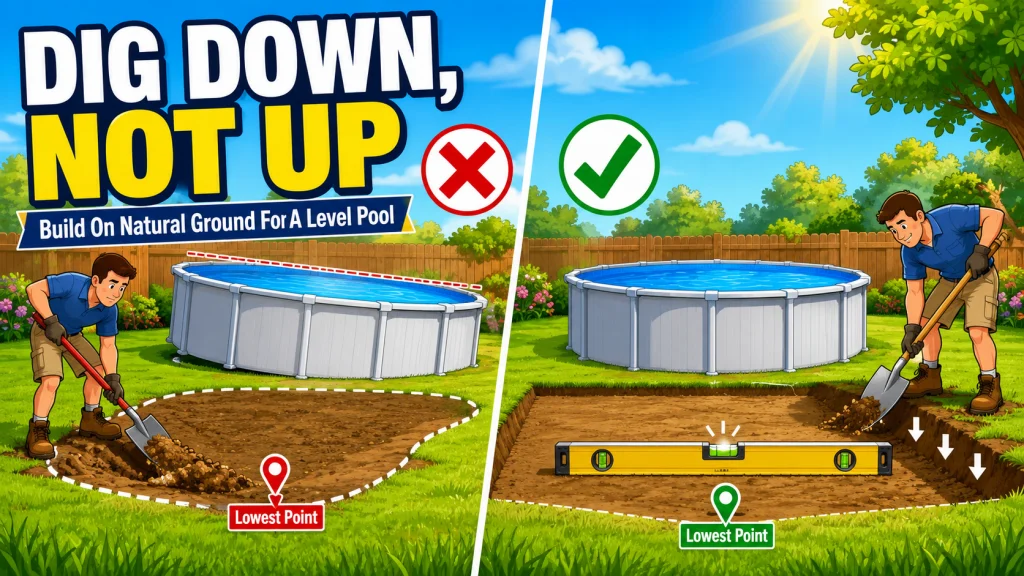
The fix is not a better way of filling low spots. It is not filling them at all. Getting this right starts with finding the lowest point inside the pool footprint first, using a long level or a string line and line level to walk the site, then treating that lowest point as your target grade for the entire circle or oval. From there, you remove soil from every higher spot until the whole footprint matches that one low point. Nothing gets added, only taken away.
- Walk the footprint with a long level or a string line and line level, checking every few feet.
- Mark the single lowest reading you find. That mark is your target grade for the whole site.
- Work outward from there, digging every higher spot down until it matches the mark.
- Recheck the full footprint once you think you are done, since one corner almost always still needs another pass.
Moving dirt from the high side of the yard into the low side to make the ground look flat, then setting the pool on a mix of virgin soil and loose fill.
Digging the high side down to match the lowest point in the footprint, so the pool sits entirely on soil that was never moved.
There is one exception worth knowing before you start second-guessing every low spot in the yard. A depression under about an inch deep is shallow enough that it can be filled with compacted mason sand instead of excavated around. Sand compacts predictably and does not carry the same settling risk as loose topsoil, so this is the one place where adding material instead of removing it is fine. Anything deeper than that should be treated as part of the grade you are digging down to, not a spot you patch over.
Field Note: The callback I get most often in late summer is not a chemistry question. It is an owner asking why one side of the pool wall looks lower than the other, and almost every time the answer traces back to a filled low spot from setup day, not anything that happened after.

This set includes a Post & Pipe Level for aligning vertical or horizontal surfaces along with 5 clip-on mini line levels for precise layout work. The #18 braided nylon line is rated at 168 lbs and resists stretching, fraying, and knotting, making it suited for construction, masonry, gardening, and outdoor marking. It comes on a reusable, tangle-free spool for smooth release and easy reloading, and works with string line holders or plumb bobs. The bold, high-visibility color helps with precision in all lighting conditions.
Check On AmazonIf you click this link and buy, we earn a commission at no additional cost to you.
How Level Is Level Enough
The number to hold yourself to is one inch of variance across the entire pool footprint, checked in more than one direction. Checking straight across the diameter is not enough on its own. Walk the level diagonally as well, because a site can read level in one line and still be off on the cross-check. If you want to see where this tolerance fits against every other step from buying to filling the pool, the complete above ground pool setup guide lays out the full sequence.
Not every amount of variance carries the same risk, and treating a half-inch dip the same as a two-inch one is where a lot of owners either panic over nothing or ignore something that needed fixing.
| Variance Across the Footprint | What It Actually Means |
|---|---|
| Under 0.5 inch | Within normal tolerance. No action needed. |
| About 1 inch | The tipping point. The wall and liner start carrying uneven load, and this is the largest variance you should accept before setup. |
| 2 inches or more | Visible tilt and real structural risk. Re-grade the site before going any further, not after the walls are up. |
Pool size changes how forgiving the site can be. An 18-foot pool carries a lot more water than a 15-foot pool at the same wall height, which means the same one-inch tolerance is doing more work spread across a larger area. The bigger the footprint, the more that a level check in only two spots will miss a low corner sitting just outside where you measured.
| Pool Size | Minimum Level Length | String Line Needed |
|---|---|---|
| Under 18 feet | 4-foot carpenter’s level | Optional, helpful for round pools |
| 18 feet and larger | 6-foot carpenter’s level | Recommended across full diameter |
A tape measure earns its place in this kit too, not for the level reading itself but for confirming the grade holds steady as you move across the diameter. Between the level, the string line, and the tape, you are checking the same thing three different ways, which is the only reliable way to catch a low spot before the wall panels go up instead of after.

This 48-in level features a durable, lightweight aluminum construction suited for all purpose use, with a center vial for easy top-read visibility. Yellow vial covers improve readability, while end caps help prevent denting. A hang hole is included for simplified storage, and the level comes with a manufacturer's limited lifetime warranty.
Check On AmazonIf you click this link and buy, we earn a commission at no additional cost to you.
Tree Roots and Rocks: The Part Owners Miss
Surface roots and rocks are the easy part. Anything sitting on top of the grade gets pulled or dug out before the base goes down, because leaving even a small rock under the liner creates a pressure point that works its way through from below over a season or two, not all at once. It is the kind of failure that looks random until you know what to check for.
Deeper roots take more judgment. A root running just under the surface needs to be cut back below the final grade line, then treated with a stump killer so it does not regrow up through the base later. Skipping the treatment step is the mistake I see most: the root gets cut, the pool goes up, and eighteen months later the same root has pushed back up through the sand.
- Walk the entire footprint and remove every visible rock and root before checking level, not after.
- Cut deeper roots below the grade line rather than trying to level around them.
- Treat cut roots to prevent regrowth through the base material.
- Recheck level after any digging around a root or rock, since removing it can shift the grade slightly.
- Never bury a root or rock under fill dirt as a shortcut. It will surface again under the liner.

This herbicide stops undesirable woody vines, plants, and broadleaf weeds and can also be used undiluted as a stump killer to prevent sprouting. It works as a foliar spray using a hose-end or tank sprayer. Suited for outdoor use around homes, cabins, fences, and walkways, it eliminates weeds within 1 to 6 weeks.
Check On AmazonIf you click this link and buy, we earn a commission at no additional cost to you.
What Actually Happens When the Ground Is Off
Most owners picture a slightly tilted pool as a minor eyesore, something they will notice and shrug off. That is not how it plays out. Once one side of the base settles even an inch, the wall on that side is carrying weight it was never designed to carry evenly, and the liner stretches unevenly to compensate. The waterline itself becomes the first visible sign, sitting noticeably higher on one side than the other, which is usually the moment an owner calls me convinced something broke overnight. Nothing broke overnight. It settled slowly, the whole season, until the tilt finally became impossible to ignore.
The settling itself usually starts within the first few weeks, well before it is visible from the deck. The earliest sign is rarely the waterline. It is a seam in the liner sitting slightly loose on one side, or a wall panel that no longer meets its neighbor flush at the top track. Catching either of those in the first month gives you a real chance to correct the grade before the frame takes on a full season of uneven load. By the time the waterline itself looks off, the settling has usually been happening for months already.
Left alone, that uneven load keeps working on the same weak point. A liner under constant uneven stress wears through years before a properly leveled one would, and a frame carrying lopsided pressure is the setup I see most often behind a wall seam failure. None of this happens the week the pool goes up. It happens the week you stop thinking about the ground, which is usually right after the water goes in.
Final Thoughts: Don’t Fight the Yard, Read It
The whole job comes down to one habit: find the lowest point, work everything else down to match it, and hold that one-inch tolerance before anything else touches the ground. Once the site checks out, the next step is putting down the correct base material, which is a separate job from leveling and worth its own careful pass rather than rushing through it the same afternoon. That is where choosing the right base material for your pool picks up, and it deserves the same attention you just gave the ground underneath it.
FAQs
📏 How do I know if my yard is level enough for an above ground pool?
Check the entire footprint with a long level and confirm it stays within one inch of variance, including diagonally, not just straight across. Anything beyond that should be corrected before the walls go up.
⛏️ Can I just fill in the low spots with dirt instead of digging down?
No, not for anything deeper than about an inch. Loose fill dirt settles under the weight of a filled pool, which is why digging the high spots down to match the lowest point holds up better long term. Shallow dips under an inch can be filled with compacted mason sand instead.
🌳 What do I do about tree roots under the pool site?
Surface roots should be removed entirely. Deeper roots need to be cut below the final grade line and treated with a stump killer so they do not regrow up through the base later.
📐 What size level do I need to check a pool site?
A 4-foot carpenter’s level works for pools under 18 feet. For 18-foot pools and larger, a 6-foot level or a string line across the full diameter gives a more reliable read.
⚠️ What happens if I set up a pool on ground that is not level?
A pool even two inches out of level will visibly tilt and put uneven pressure on the liner at the low side, which is where cracks and bulging tend to start first. It gets worse, not better, once the pool is filled.