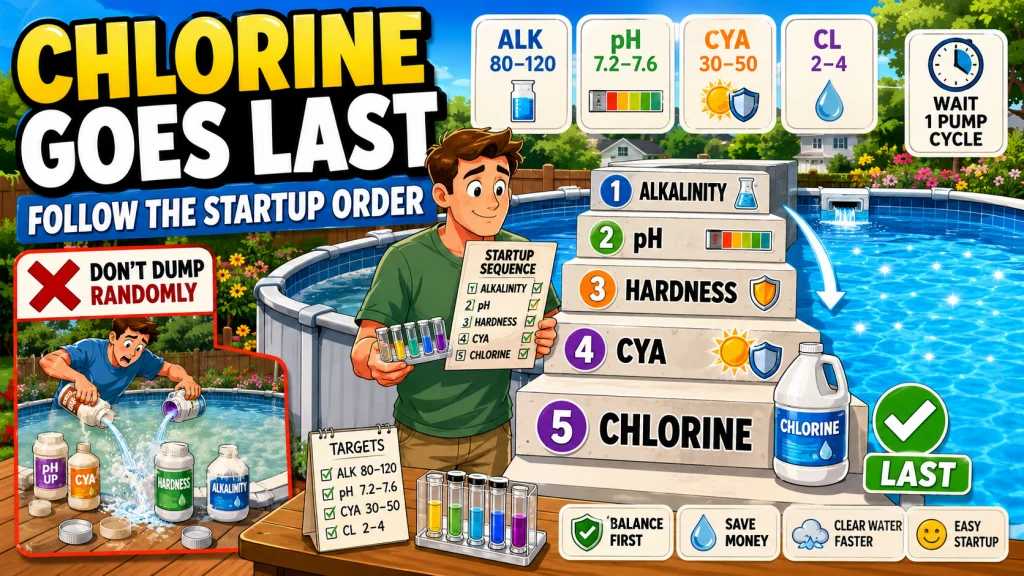
If you just filled a new above ground pool and you are staring at five different chemical bottles, the order you add them in actually changes how well each one works. On every install, I follow the same startup sequence: total alkalinity first, then pH, then calcium hardness, then cyanuric acid, and chlorine last. Skip that order and you usually end up with cloudy water, wasted chemical, or a chlorine dose that barely does anything because the pH was never corrected first. This guide walks through each step, the target number for that step, and the reason it has to come before the next one.
Why the Above Ground Pool Startup Chemical Sequence Matters
Pool chemicals do not sit in the water independently. They react with each other, and the water chemistry you set with one chemical changes how the next one behaves. This is the part most first-time owners never get told at the store: you can buy every chemical on the shelf and still end up with a cloudy, stubborn pool if you dump them in whatever order feels logical. This order is not just a suggestion. It is what keeps each chemical working with the next one instead of fighting against it.
I have opened plenty of new pools where the owner added chlorine first because that is the chemical everyone has heard of, then wondered why the water turned cloudy and stayed that way for a week. The chlorine was not defective. It was working in water that had no stable alkalinity or pH yet, so the readings kept swinging and the chlorine never had a fair shot. Getting the startup order right the first time saves you from re-testing and re-dosing a pool that should have been simple.
For the full walkthrough of ground prep and filling before you ever open a chemical bottle, this above ground pool chemical startup guide covers what happens before this sequence even starts. Everything below assumes the pool is filled, the pump is running, and you are ready to test the water for the first time.
Before You Start: Test First, Then Correct Only What the Water Needs
Sequence does not mean you pour all five chemicals into the pool no matter what. It means the order you correct each reading in, once your test kit tells you that reading is actually out of range. Some fill water already comes in with decent alkalinity or calcium hardness straight from the tap, and if a number is already sitting inside its target range, you skip that step and move to the next one in the sequence.
Test the water first, before you touch a single bottle. You do not need every product on the shelf. You need the one that corrects the specific number your test kit is showing, in the direction it needs to move. Have your test kit, a measuring cup, and the pump running before you start, and work through the five steps one reading at a time instead of guessing at what the pool “probably needs.”

This kit includes 150 test strips for checking bromine, total alkalinity, pH, free chlorine, total hardness, cyanuric acid, and total chlorine. Each strip is dipped for 1 second and read after 15 seconds against the bottle chart. The strips are designed for pools, spas, and hot tubs and should be kept dry between uses.
Check On AmazonIf you click this link and buy, we earn a commission at no additional cost to you.
The Five-Chemical Startup Order
The order I follow on every startup, and the one confirmed by pool chemistry resources like AquaDoc, is total alkalinity first, then pH, then calcium hardness, then cyanuric acid, and chlorine last. Each one sets up the water for the chemical that comes after it. Here is the target range for each so you have the numbers in front of you before you start testing.
| Step | Chemical | Target Range |
|---|---|---|
| 1 | Total alkalinity | 80 to 120 ppm |
| 2 | pH | 7.2 to 7.6 |
| 3 | Calcium hardness | 175 to 225 ppm (vinyl liner pools) |
| 4 | Cyanuric acid (CYA) | 30 to 50 ppm |
| 5 | Chlorine | 2 to 4 ppm |
That table is the short version. The reason each step has to happen in that order is where most guides stop explaining, so that is where I want to spend the rest of this article.
Step 1: Total Alkalinity First
Total alkalinity is the water’s buffering capacity, basically how much it resists a swing in pH. If you try to set pH before alkalinity is established, the pH reading will not hold. You will add pH increaser, test an hour later, and find the number has already drifted because the water had nothing stabilizing it. Setting alkalinity first gives every reading after it something solid to sit on.
To raise alkalinity, use sodium bicarbonate, the same compound sold as baking soda or alkalinity increaser at the pool store. To lower it, use muriatic acid in small measured doses, then retest. In most 15-foot setups I have opened, alkalinity comes in low straight from tap water, so plan on adding rather than lowering in the majority of first fills.
Step 2: pH After Alkalinity Has Circulated
Once alkalinity is in range, let it circulate for one full pump cycle before you touch pH. This is not a suggestion to save time, it is the step most people skip and the one that causes the most repeat testing. pH matters because it directly controls how well your chlorine works later in the sequence. At a pH of 8.0, chlorine is only around 20 percent as effective as it is at 7.2. That is not a small difference, it is the reason a “properly dosed” pool can still turn green if the pH was never corrected.
Low pH has its own problems. Below 7.2, the water becomes corrosive to metal fittings, ladder hardware, and pump components, and it will irritate skin and eyes faster than most owners expect. Use pH increaser, which is sodium carbonate, to raise it, and muriatic acid to lower it. Test again after circulation before moving to the next step.
Step 3: Calcium Hardness
Calcium hardness is the one owners most often skip entirely, especially on soft-sided and steel frame pools, because it does not affect water clarity the way chlorine or alkalinity does. Skip it anyway and the water goes the other direction: it becomes aggressive and starts pulling calcium out of anything it touches, including liner seams and metal fittings. Vinyl liner pools need less calcium than plaster pools, so the 175 to 225 ppm target here is lower than what an inground plaster pool would run.
Calcium chloride is the standard product to raise this number. There is no practical way to lower calcium hardness in an above ground pool other than partial draining and refilling, so if your fill water already tests high, that is worth knowing before you add anything.
Step 4: Cyanuric Acid (CYA)
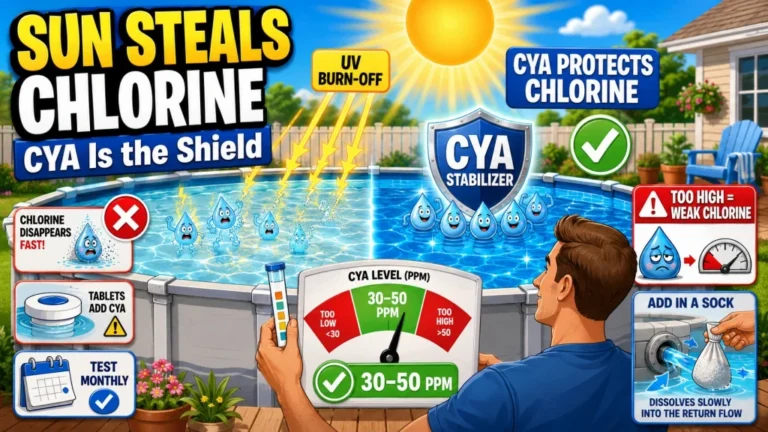
CYA has to go in before chlorine in any outdoor above ground pool, because CYA is what protects your chlorine from breaking down in direct sunlight. Add chlorine to a pool with no CYA in the water and the sun will burn through a big share of that dose before it ever touches an algae spore. I am not going to cover CYA in depth here since the full explanation of why CYA has to come before chlorine is its own topic, but the short version for this sequence is: get CYA to 30 to 50 ppm before you add a single dose of chlorine.
Step 5: Chlorine Last
Chlorine goes in last because every step before it was setting up the conditions chlorine needs to actually work: stable alkalinity, corrected pH, adequate calcium hardness, and CYA protection from the sun. Bring chlorine to 2 to 4 ppm for normal operation, circulate for a full pump cycle, and resist the urge to add anything else for 24 hours after that first chlorine dose. Give the water time to show you an accurate reading instead of chasing numbers that have not settled yet.

This 4-pound pH increaser raises low pool pH and helps reduce eye and skin irritation associated with acidic water. Keeping pH balanced also helps protect pool equipment and surfaces from corrosion. It is formulated for swimming pool water balancing and can be paired with the Clorox Pool App for dosage guidance.
Check On AmazonIf you click this link and buy, we earn a commission at no additional cost to you.
The Waiting Rule Between Each Chemical
Every one of the five steps above needs to circulate for at least one full pump cycle before the next chemical goes in. This is the part of startup that gets rushed the most, usually because the owner is standing there with a test kit wanting the pool ready today. Adding the next chemical before the last one has fully distributed through the water produces false readings, and false readings lead to overdosing or underdosing the step after it.
Field Note: The most common call I get after a startup goes wrong is not “the chemicals didn’t work,” it is “I tested right after adding it and the number looked off, so I added more.” Most of the time, that second dose is what throws the water off. Patience between steps matters more than the exact chemical brand you bought.
If your pump turnover rate is on the slower side, which is common with the stock pump that ships in most starter kits, that full cycle can take longer than it would with an upgraded pump. That is worth knowing going into startup, because a slower turnover means a longer wait between each of the five steps, not a reason to skip the wait.

This pump uses HydroAeration Technology to improve water circulation, filtration, clarity, and negative ion levels at the surface. It delivers a 1,500 GPH flow rate at the pump and 1,180 GPH in the pool, suitable for Intex above ground pools up to 9,400 gallons with a 1.25 inch hose fitting. Installation just requires hooking up the hoses and plugging in, with partial assembly needed. It uses easy to clean Type A Dacron paper cartridges, which should be replaced every 2 weeks.
Check On AmazonIf you click this link and buy, we earn a commission at no additional cost to you.
The Mistake That Causes the Most Cloudy Water Calls
The single most common mistake I see on a first startup is adding chlorine before alkalinity and pH are dialed in. It makes sense on paper: chlorine is the chemical everyone associates with pool care, so it feels like the obvious first move. In practice, chlorine added into unstable water can underperform because the pH has not been corrected, or it can leave you chasing cloudy, unstable readings for days while the rest of the chemistry catches up.
- Test total alkalinity first and adjust before touching anything else.
- Let each chemical circulate for one full pump cycle before adding the next.
- Correct pH before adding chlorine, since chlorine loses a large share of its effectiveness above 7.6.
- Add CYA before the first chlorine dose, not after, so sunlight is not burning through your chlorine unprotected.
- Wait 24 hours after the startup chlorine dose before adding anything further.
That list is the sequence in its simplest form. If you keep that order taped to the pump housing for your first season, you will avoid the repeat testing and repeat dosing that eats up most of an owner’s first few weekends with a new pool. For each step, match the correction to what your test shows instead of assuming every bottle on the shelf belongs in your pool.

This 4-pound granular pool stabilizer contains concentrated cyanuric acid for raising the CYA level in pool water. It helps reduce chlorine loss caused by sunlight so sanitizer remains effective longer. The granular formula allows the amount added to be measured according to the pool volume and current test result.
Check On AmazonIf you click this link and buy, we earn a commission at no additional cost to you.
Final Thoughts: Order First, Then Everything Else Gets Easier
The above ground pool chemical order is not complicated once you see why each step exists. Alkalinity stabilizes the water, pH sets the conditions chlorine needs to work, calcium hardness protects your liner and fittings, CYA shields your chlorine from the sun, and chlorine finishes the job once everything ahead of it is in place. Get that sequence right on day one and the rest of the season is mostly maintenance, not correction. The buying decision at each step starts with the test result, not with grabbing every bottle at the store, so let the reading tell you what to correct before you decide what to add.
This article covered the startup sequence specifically. For the ground prep, assembly, and broader setup decisions that come before you ever crack open a chemical bottle, the full above ground pool setup process walks through everything from leveling to filling.
FAQs
🧪 What order should I add chemicals to a new above ground pool?
Total alkalinity first, then pH, then calcium hardness, then cyanuric acid, and chlorine last. Let each one circulate for a full pump cycle before adding the next so your readings are accurate.
⏱️ How long do I need to wait between adding pool chemicals?
Wait at least one full pump cycle after each chemical before testing and adding the next one. If your stock pump runs on the slower side, that cycle takes longer, so plan on a longer wait rather than rushing the next step.
💧 Why does chlorine not work if I add it first?
Chlorine’s effectiveness depends heavily on pH. At a pH of 8.0, chlorine is only around 20 percent as effective as it is at 7.2, so adding chlorine before pH is corrected wastes a large share of the dose.
🔬 Does cyanuric acid go in before or after chlorine?
Cyanuric acid goes in before chlorine in any outdoor above ground pool. It protects chlorine from breaking down in sunlight, so adding it after chlorine means your early doses are less protected from UV loss.
⚖️ What happens if I skip calcium hardness on startup?
Water with low calcium hardness becomes aggressive and starts pulling calcium from surfaces it touches, including liner seams and metal fittings. Vinyl liner pools need 175 to 225 ppm, which is lower than a plaster pool requires.
🌡️ How soon can I swim after the startup chemical sequence?
Wait until chlorine has circulated for a full pump cycle and your readings are stable, then avoid adding any additional chemicals for 24 hours after that first chlorine dose. Test before swimming rather than going by the clock alone.
Sources and References
- AquaDoc’s guide on the correct pool chemical startup order, confirming the total alkalinity, pH, calcium hardness, CYA, chlorine sequence and the one-pump-cycle waiting rule between steps.
- TroubleFreePool’s pool chemistry reference, confirming the relationship between pH level and chlorine effectiveness, including the reduced effectiveness of chlorine at higher pH.
- TroubleFreePool’s pool chemistry reference, confirming the calcium hardness target range of 175 to 225 ppm for vinyl liner pools.